Name Cells, Cell Ranges, and Constants
In Excel, you can name cells, cell ranges, and constants. When creating formulas, named cells and named cell ranges are easier to remember than cell addresses and range references. For example, =Revenue-Expenses is easier to remember than =B3:B6-B9:B21.
Use the Range dialog box to name cells and cell ranges. Names must follow these rules:
- Be fewer than 255 characters
- Start with a letter or a backslash
- Cannot include symbols
- Can includes a dot or an underscore as a separator
When you name a cell, range, or constant you determine its scope. A name can be recognizable to a single worksheet or to an entire workbook. For example, if you name cell A1 on Sheet1 Sales and then set the scope to Sheet1, if you are on Sheet2 and you use Sales in a formula, Excel will not recognize the name. You can, however, give a cell on Sheet2 the name Sales, give it a scope of Sheet2, and when you use Sales in a formula on Sheet2, Excel will refer to Sheet2 Sales. If you name cell A1 on Sheet1 Sales and then set the scope to Workbook, if you are on Sheet2 and you use Sales in a formula, Excel will recognize the name and will use the value in cell A1 on Sheet1.
You can also name a constant. A constant is a value. For example, if every employee is getting a 4% raise, you can name 4%, "Raise", and then multiply each employee's salary by the name "Raise" to obtain the amount of the salary increase.
Name a cell or range of cells
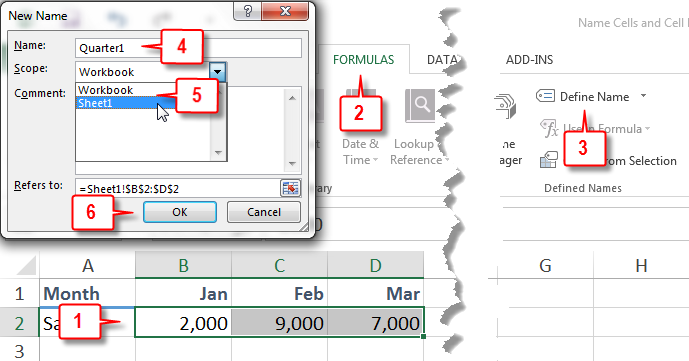
- Select the cell or cell range you want to name.
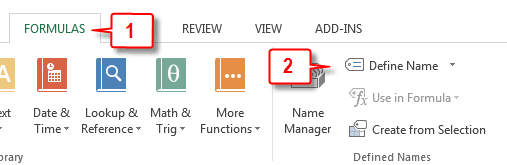
- Choose the Formulas tab.
- Click Define Name. The New Name dialog box opens.
- Type the name you want to give the cell or range in the Name field.
- Click the down arrow next to the Scope field and then select the scope of the name.
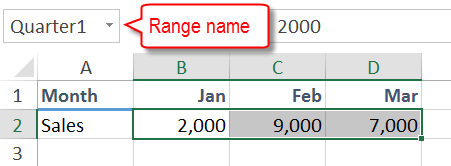
- Click OK. Excel creates the named range. The range name appears in the name box.
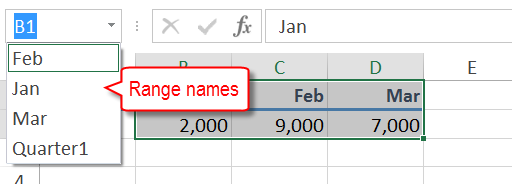
You can have Excel name several ranges at once by using Excel's create from selection option. When using this option, select the values you want to name and the labels that identify them. Excel will turn the labels into range names and give them a scope of workbook.
Name Several Ranges at Once
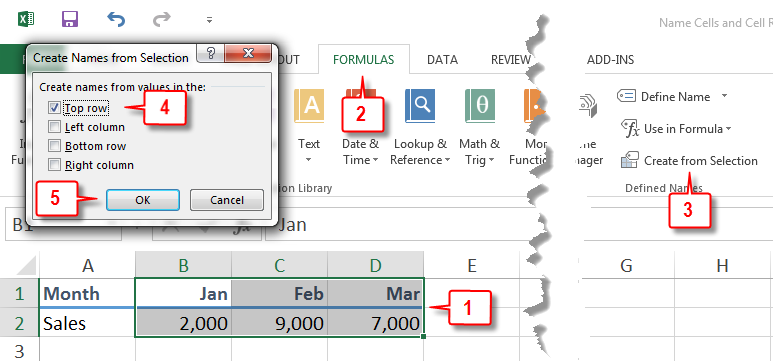
- Select the range that you want to name. Include labels.
- Choose the Formulas tab.
- Click Create from Selection in the Defined Names group. The create names from selection dialog box opens.
- Click the location of the range names.
- Click OK. Excel names the ranges. The names appear in the name box.
To edit or delete a named range, use the Name Manager on the Formulas tab.
Delete a Named Range
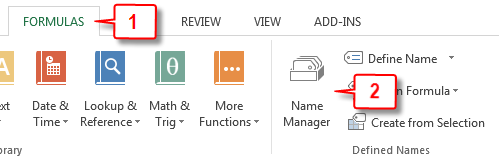
- Choose the Formulas tab.
- Click Name Manager in the Defined Names group. The Name Manager dialog box opens.
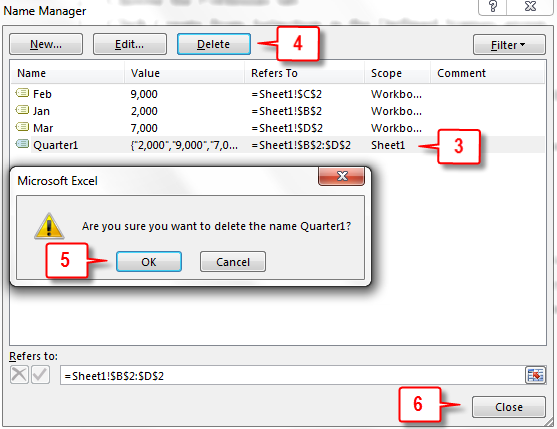
- Click the range you want to delete. Hold down the Ctrl key and click to select multiple ranges.
- Click Delete. Excel asks, "Are you sure you want to delete…?"
- Click OK. Excel deletes the range name.
- Click Close. Excel closes the Name Manager dialog box.
Edit a Named Range
- Choose the Formulas tab.
- Click Name Manager in the Defined Names group. The Name Manager dialog box opens.
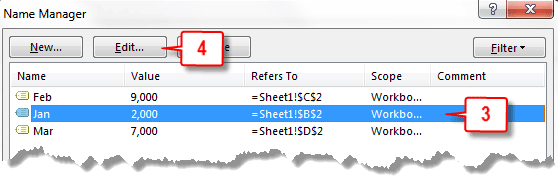
- Click the range you want to edit.
- Click Edit. The Edit Name dialog box opens.

- Make your changes.
- Click OK. Excel returns to the Name Manager dialog box.
- Repeat steps three through six to edit additional ranges or Click Close to exit the Name Manager.
Examples of formulas that use names:
=January+February+March
=Quarter_1+Quarter_2
=January *10%
Create a Named Constant
- Choose the Formulas tab.
- Click Define Name. The New Name dialog box opens.
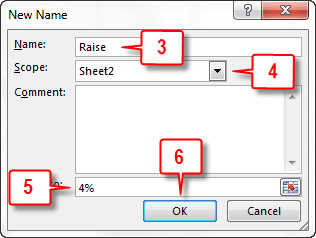
- Type the name you want to give the constant in the Name field.
- Click the down arrow next to the Scope field and then select the scope.
- Type the value you want to assign to the constant in the Refers To field.
- Click OK. Excel names the constant.
 Tip
Tip
If you have formulas in your worksheet that reference cells or ranges that you have named, but the formulas do not include the names, you can add them. Select the formulas. Choose the Formulas tab. Click the down-arrow next to Define Name. A menu appears. Click Apply Names. The Apply Names dialog box opens. Click the names you want to apply. Click OK. Excel places the names in your formulas.
Leave a Comment