Inkscape: The Bezier (Pen) Tool
So far in these tutorials, we have been working with shapes. We are now going to take a look at the Bezier tool. You can use it to create paths made up of straight and curved lines. As a result, it is probably the most versatile tool and the hardest to master.
It has five modes: 1) Create Regular Bezier Path. 2) Create Spiro Path. 3) Create BSpline Path. 4) Create a Sequence of Straight Line Segments. 5) Create a Sequence of Paraxial Line Segments.
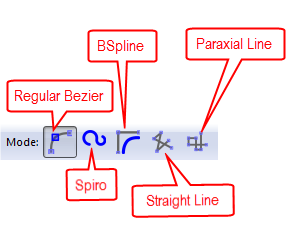
We will look at each of them individually. Starting from the right, the easiest, and working left, to the hardest.
Create a Sequence of Paraxial Line Segments (Create Straight Lines)
Selecting this mode enables you to create straight horizontal and vertical lines. In this mode, you cannot create diagonal or curved lines.
- Click the Bezier tool, press the letter b on your keyboard, or press F6 to activate the Bezier tool.
- Click the Create a Sequence of Paraxial Line Segments icon.
- Click and then drag. When you want to change direction, click again and drag. Note that you cannot create a diagonal line.
- Click and then press Enter, double-click, or right-click to end the path.
Create a Sequence of Straight Line Segments (Create Horizontal, Vertical, and Diagonal Paths)
Selecting this mode, enables you to create horizontal, vertical, and diagonal lines.
- Click the Bezier tool, press the letter b on your keyboard, or press Shift + F6 to activate the Bezier tool.
- Click the Create a Sequence of Straight Line Segments icon.
- Click and drag. When you want to change direction, click again and drag. Note that you can create straight and diagonal lines.
- Click and then press Enter, double-click, or right-click to end the path.
Create a BSpline Path
Selecting this mode, enables you to create a series of smooth curves.
- Click the Bezier tool, press the letter b on your keyboard, or press Shift + F6 to activate the Bezier tool.
- Click the BSpline icon.
- Click where you want to begin your curved line, drag to where you want a curve, click again, drag to where you want another curve, click again. Continue until you have completed your path. The blue line shows the shape of the path.
- Click and then press Enter, double-click, or right-click to end the path.
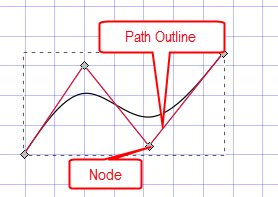
You can adjust the shape of the curves by activating the Nodes tool and then clicking and dragging the nodes that are located on the path outline. If you need to add or delete nodes, add them to or delete them from the path outline. To add a node, double-click on the path outline. To delete a node, select the node and then press the Delete key. If you do not see the path outline, click the Show Path Outline icon ![]() which is located on the Node tools' control bar.
which is located on the Node tools' control bar.
To convert a BSpline to a regular path, click Path > Object to Path, press Shift + Ctrl + C, or click the Convert Selected Object to Path icon ![]() . Once you have converted a BSpline to a regular path, you cannot convert it back.
. Once you have converted a BSpline to a regular path, you cannot convert it back.
Create a Spiro Path
Selecting this mode enables you to create a series of smooth curves. When compared to a BSpine path, this mode creates rounder curves. You may find it useful when creating spirals.
- Click the Bezier tool, press the letter b on your keyboard, or press Shift + F6 to activate the Bezier tool.
- Click the Spiro icon.
- Click where you want to begin your curved line, drag to where you want a curve, click again, drag to where you want another curve, click again. Continue until you have completed your line. The blue line indicates the shape of the path.
- Click and then press Enter, double-click, or right-click to end the path.
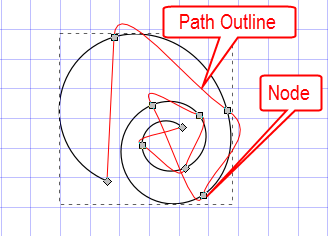
You can adjust the shape of the curves by activating the Nodes tool and then clicking and dragging the nodes on the path outline. If you need to add or delete nodes, add them to or delete them from the path outline. If you do not see the path outline, click the Show Path Outline icon ![]() which is located on the Node tools' control bar.
which is located on the Node tools' control bar.
To convert a Spiro path to a regular path, click Path > Object to path, press Shift + Ctrl + C, or click the Convert Selected Object to Path icon ![]() . Once you have converted a Spiro path to a regular path, you cannot convert it back.
. Once you have converted a Spiro path to a regular path, you cannot convert it back.
Create a Regular Bezier Path
Selecting this mode, enables you to create straight and curved lines.
- Click the Bezier tool, press the letter b on your keyboard, or press Shift + F6 to activate it.
- Click the Bezier path icon.
- To create straight lines, click where you want to start a line, click again where you want to end it. To create curved lines, click where you want to start the line, and then press the left mouse button and drag to create a curve, release the left mouse button and press it again where you want another curve.
While using the Bezier tool, you may find it useful to take a look at the status bar. It will display the angle and the distance from the last node as well as useful keys.
Shape Options
Each mode has the following seven Shape options:

- None: Creates a line path.
- Triangle In: Creates a triangular shape with a fill but no stroke. The wide end is at the start and the narrow end is at the end. To make adjustments to the object, click the Nodes tool while the object is selected. You will see a pink control at the wide end. You can drag it to change the width and shape of the object. You will also see nodes at the top and bottom. You can drag these nodes to change the length and direction.
- Triangle Out: Creates a triangular shape with a fill but no stroke. The narrow end is at the start and the wide end is at the end. To make adjustments to the object, click the Nodes tool while the object is selected. You will see a pink control at the wide end. You can drag this control to change the width and shape of the object. You will also see nodes at the top and bottom. You can drag these nodes to change the length and direction.
- Ellipse: Creates an elliptical shape with a fill but no stroke. To make adjustments to the object, click the Nodes tool while the object is selected. You will see a round handle control on the object. You can drag this control to change the width. There are nodes at both ends. You can drag these nodes to change the length and direction.
- From Clipboard: Creates a path that uses the shape of the object on the clipboard. Follow these steps: 1) Create a Shape. 2) Copy the shape. That will place it on the clipboard. 3) Activate the Bezier tool. 4) On the Controls toolbar select From Clipboard in the Shape field. 5) On the Controls toolbar select a Mode. 6) Draw.
- Bend from Clipboard: The object on the clipboard follows the path you draw. The object on the clipboard must be a path and if it consists of more than one object, it must be grouped.
- Last Applied: Creates a path using the Shape option you last used.
| Useful Keys | |
| Arrow Keys Alt + Arrow moves the node by one screen pixel Shift + Arrow moves the node by ten times the normal amount |
Moves the last node created |
| Shift + Click | As you draw, turns what would normally be a curved node to a corner node |
| Ctrl | Enables you to rotate using multiples of the rotation snap angle |
| Shift + L | Changes an unfinished curved line into a straight line |
| Shift + U | Changes an unfinished straight line into a curved line |
| Backspace or Delete | Deletes the last node drawn
|
| Esc or Ctrl + Z | Deletes an unfinished path |
| Enter, a double-click, or a right-click.
|
Completes a path
|
| Click first node | Closes a path |
Very nice. Great job!
Can this be used online? I am developing an app and may need a simple tool for the user to specify a path along which a graphic will move. If you could put, “aPARK path tool” in the Subject line, please.
I am not positive, but I do not think so.
Under the heading of “Create a Regular Bezier Path” in the YouTube video the example of drawing the oval shape is not clear. Overall, thank you for the outstanding job!