Create Columns
Word documents can have multiple columns. The Columns menu lets you choose from the following options: One, Two, Three, Left, and Right.
| Columns Menu Options | |
|---|---|
| Option | Description |
| One | One is the default. It creates a single column. Text and objects flow straight down the page. |
| Two | Two creates two columns of equal size. Text and objects fill the left column; then flow over to the right column. |
| Three | Three creates three columns of equal size. Text and objects fill the columns one by one, moving from left to right. |
| Left | Left creates two columns of unequal size. The left column is smaller than the right column. Text and objects flow from left to right. |
| Right | Right creates two columns of unequal size. The right column is smaller than the left column. Text and objects flow from left to right. |
If you want to custom format columns, use the Columns dialog box.
The following explains the entry you should make in each field in the Columns dialog box:
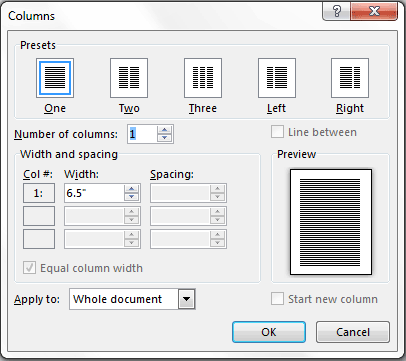
Number of Columns: Enter the number of columns you want.
Line Between: Check this box if you want Word to place a solid line between columns.
Width: Enter the width you want your column to be.
Spacing: Enter the amount of space you want between the column you are assigning a width to and the next column.
Equal Column Width: Check this box if you want all of the columns to be the same width.
Apply To: Select the scope of your changes. Choose from This Point Forward, This Section, and Whole Document.
Create Columns
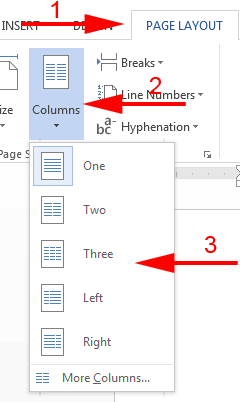
- Choose the Page Layout tab.
- Click Columns. A menu appears.
- Click the menu option you want. Word divides your document into columns.
Create Custom Columns
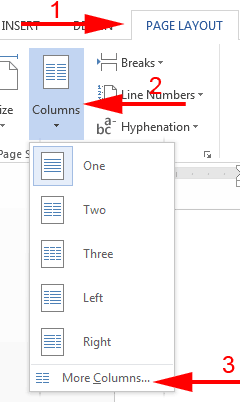
- Choose the Page Layout tab.
- Click Columns. A menu appears.
- Click More Columns. The Columns dialog box opens.

- Type the number of columns you want.
- Check the Line Between box if you want to place a solid line between columns.
- Check Equal Column Width if you want every column to be the same width. Then go to step 11.
- Type the width you want each column to be in the Width field.
- Type the space you want between columns in the Spacing field.
- Repeat steps eight and nine for each column you want to create.
- Click the down-arrow next to the Apply To field; then click the option you want.
- Click OK. Word adds columns to your document.
 Tip
Tip
Column breaks instruct Word to begin the text that follows the column break at the top of the next column. If you want to insert a column break, perform these steps: 1) Place the insertion point where you want your column break. 2) Choose the Page Layout tab. 3) Click Breaks. A menu appears. 4) Click Column. Word inserts your column break.
 I cannot see my columns. Why?
Check your view. Columns only display in Print Layout view.
| Shortcut Keys | |
|---|---|
| Description | Shortcut Keys |
| Insert column break | Ctrl+Shift+Enter |
Leave a Comment