The Word Window
You use the Word window to interact with Word—you type your text into the window and you use the window to tell Word what to do. Here I will explain the parts of the Word window.
A Quick Access Toolbar: In the upper-left corner of the window is the Quick Access toolbar, sometimes referred to as the QAT. The Quick Access Toolbar provides commands you frequently use. Save, Undo, and Redo appear on the toolbar by default. Click Save to save your file, Undo to roll back an action you have taken, and Redo to reapply an action you have rolled back.
B Title Bar: In the top center of the window to the right of the Quick Access toolbar is the Title bar. The Title Bar displays the title of your document. Word names the first new document you open Document1. As you open additional new documents, Word names them sequentially. When you save a document, you assign the document a new name.
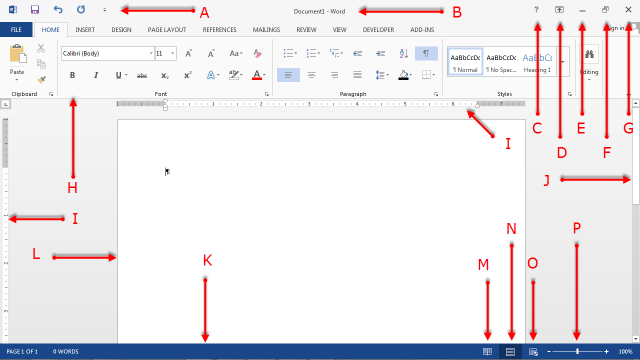
C Help Button![]() : The Help button, along with several other buttons, is located in the upper-right corner of the window. It takes you to the Word help area. In the help area, you can search for information on how to perform tasks.
: The Help button, along with several other buttons, is located in the upper-right corner of the window. It takes you to the Word help area. In the help area, you can search for information on how to perform tasks.
D Ribbon Display Options Button![]() : The Ribbon Display Options button is located next to the Help button. Use it to display the following menu options: Auto-hide Ribbon, Show Tabs, and Show Tabs and Commands. To learn more about this option, see the section The Word Ribbon.
: The Ribbon Display Options button is located next to the Help button. Use it to display the following menu options: Auto-hide Ribbon, Show Tabs, and Show Tabs and Commands. To learn more about this option, see the section The Word Ribbon.
E Minimize Button![]() : The Minimize button is located next to the Ribbon Display Options button. To remove Word from view and place the Word icon on the Windows taskbar, click the Minimize button. To restore Word, click the Word icon on the Windows taskbar.
: The Minimize button is located next to the Ribbon Display Options button. To remove Word from view and place the Word icon on the Windows taskbar, click the Minimize button. To restore Word, click the Word icon on the Windows taskbar.
F Restore Down Button ![]() : The Restore Down button is located next to the Minimize button. The Restore Down button reduces the size of the Word window. When you click the Restore Down button, it turns into the Maximize button.
: The Restore Down button is located next to the Minimize button. The Restore Down button reduces the size of the Word window. When you click the Restore Down button, it turns into the Maximize button.
Maximize Button ![]() : The Maximize button fills your screen with the Word window. When you click the Maximize button, it turns into the Restore Down button.
: The Maximize button fills your screen with the Word window. When you click the Maximize button, it turns into the Restore Down button.
G Close Button![]() : The Close button is located in the far right corner of the Word window. It closes the active document. When you click the Close button, if you have not previously saved your document or if you have made changes to your document since you last saved, a dialog box opens. Click Save if you want to save your changes, Don't Save if you do not want to save your changes, or Cancel if you have decided not to close your document. If the document you are closing is the only document open, the Close button also closes Word.
: The Close button is located in the far right corner of the Word window. It closes the active document. When you click the Close button, if you have not previously saved your document or if you have made changes to your document since you last saved, a dialog box opens. Click Save if you want to save your changes, Don't Save if you do not want to save your changes, or Cancel if you have decided not to close your document. If the document you are closing is the only document open, the Close button also closes Word.
H Ribbon: To tell software what to do, you issue commands. In Word, you use the Ribbon to issue commands. The Ribbon is located below the Title bar. To learn more about the Ribbon, see the The Word Ribbon section.
I Ruler: Optionally, the ruler is found below the Ribbon. Use the ruler to change the format of your document. If your ruler is not visible, follow the steps listed here:
Display the Ruler
- Choose the View tab.
- Click the Ruler box in the Show group. Word displays the ruler.
J Vertical and Horizontal Scroll Bars: You can move up, down, and across your window by dragging the icon located on a scroll bar. The vertical scroll bar is located along the right side of the window. The horizontal scroll bar is located just above the Status bar. To move up and down your document, click and drag the icon on the vertical scroll bar up and down. To move back and forth across your document, click and drag the icon on the horizontal scroll bar back and forth. You will not see a vertical scroll bar if the height of your document fits on your screen; you will not see a horizontal scroll bar if the width of your document fits on your screen.
K Status Bar: The Status bar appears at the very bottom of the window and provides information such as the current page and the number of words in your document. You can change what displays on the Status bar by right-clicking on the Status bar and selecting the options you want from the Customize Status Bar menu. A check mark next to an item means it is selected. You click an unselected menu item to select it. You click a selected menu item to unselect it.
L Text Area: Just below the ruler is a large area called the text area. Here is where you type your document. The blinking vertical line in the upper-left corner of the text area is the insertion point. As you type, your text appears at the insertion point.
M Read Mode Button ![]() : The Read Mode button formats your document to make reading your document easier. It appears on the Status bar if View Shortcuts is selected on the Status bar menu.
: The Read Mode button formats your document to make reading your document easier. It appears on the Status bar if View Shortcuts is selected on the Status bar menu.
N Print Layout Button ![]() : The Print Layout button displays your document as it will appear when you print it. It is the default view. It appears on the Status bar if View Shortcuts is selected on the Status bar menu.
: The Print Layout button displays your document as it will appear when you print it. It is the default view. It appears on the Status bar if View Shortcuts is selected on the Status bar menu.
O Web Layout ![]() : The Web Layout button displays your document as it would appear in a browser, such as Internet Explorer. It appears on the Status bar if View Shortcuts is selected on the Status bar menu.
: The Web Layout button displays your document as it would appear in a browser, such as Internet Explorer. It appears on the Status bar if View Shortcuts is selected on the Status bar menu.
P Zoom Slider and Zoom: The Zoom slider zooms in and out on your document. Dragging the slider to the left zooms out, makes your document smaller, and allows you to see more of your document. Dragging the slider to the right zooms in, makes your document larger, and reduces the amount of your document you can see. The Zoom slider appears on the Status bar if Zoom Slider is selected on the Status bar menu. The percentage of zoom appears to the right of the zoom slider, if Zoom is selected on the Status bar menu.
Thank you so much!
Thank you 😊😊👍👍
𝕋𝕪𝕧𝕞!
So helpful thank youu
TYSM so much this would help my home work
ok
this is perfect, thank you.
Thanks sir
Thank You
Thank you for everything
Thanku sir
Ok
Thanks for everything
My pleasure