Inkscape: The Window
I want to start by introducing you to the Inkscape window. I just want you to have a basic understanding. I will get into the details later.
When you open Inkscape, Inkscape presents you with the Inkscape window. You use this window to interact with the software—you draw in it and you use it to tell Inkscape what to do.
You can change the layout of your window by clicking View on the menu bar and then on the drop-down menu that appears clicking either Default, Custom, or Wide. I based this explanation on the Default option.
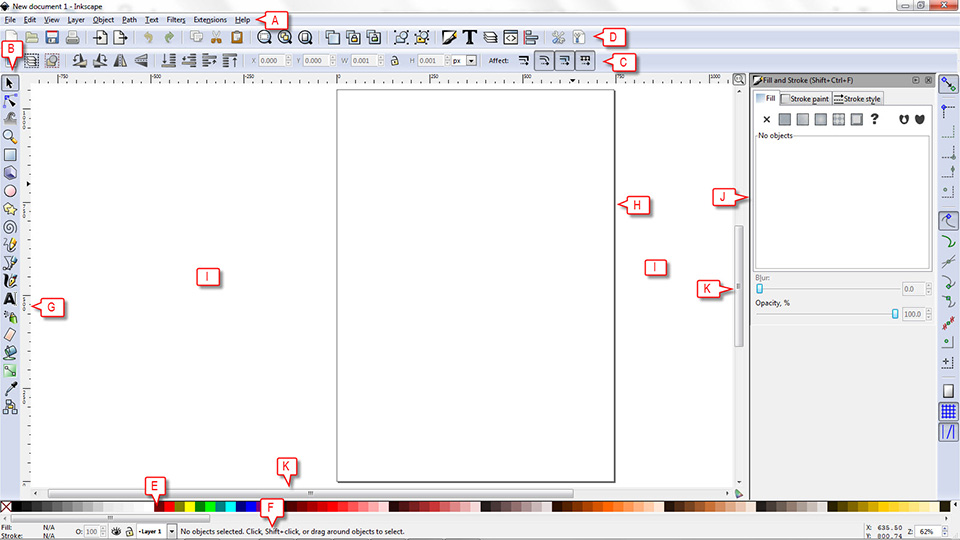
A) Menu Bar: Click any item on the Menu Bar and a drop-down menu will appear. Click to select the option you want.
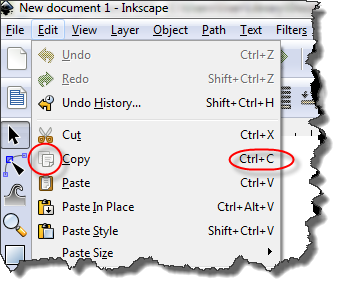
To the right of many menu options are shortcut keys. You can press the short cut keys to invoke the command. For example, if you click Edit, a menu will appear and you will see Ctrl + C to the right of Copy. You can select an object and then press Ctrl + C to copy instead of using the menu. To the left of many menu options are icons. Where you see the same icon on a Command bar, you can click it to invoke the command instead of using the menu.
B) Drawing and Editing Tools: These are your tools. You use them to create your image.
Click the tool or press the tool's shortcut to select it. You can hover over a tool with your mouse pointer to find out what its shortcut key is.
Double-click the tool to set your tool preferences.
C) Tool Control Bar: Each tool has options you can set. Tool options appear here.
D) Command Bar: Icons for popular commands appear on the command bar. You can quickly issue a command by clicking its icon.
E) Color Selector: Use this bar to change the color of objects.
Objects have a fill color and a stroke color. The stroke color outlines the object and the fill color fills its interior. Select and object then click a color to change its fill color. Select and object then hold down the Shift key as you click a color to change its stroke color.
F) Status Bar: Displays useful information as you work.
G) Rulers: Displays canvas measurements.
If you want to change the unit of measure:
- Click File > Document Properties. The Document Properties dialog box opens.
- Click the down-arrow next to the Default Unit field and select the unit of measurement you want.
Press Ctrl + R to toggle the display of the ruler on and off.
H) Page: The area you are going to use to create your e-tangles. It is part of the canvas.
I) Canvas: The area you a going to use to store the objects you use in your e-tangle. Think of the page as your paper and the rest of the canvas as your desktop.
J) Dockable Dialog Box: Some dialog boxes once opened remain open for easy reference. They dock along the right side of the window.
Press F12 to toggle the display of dockable dialog boxes on and off.
K) Scroll Bars: Use scroll bars to scroll left, right, up and down your canvas.


OMG, this is the best ever. Me and my 74 year old younger sister, Melody, are signing up for a laser wood cutting workshop. We want to learn how to edit and cut script words from wood. I will create a new blog and post our progress along the way. THANK YOU for your tutorials! Lucie
Thank you-I’ve needed elp getting started with the very basics!